Magic cube
Good morning my aeronautics enthusiasts,
I know it’s
been a few days more since my last blog. I usually publish them on Thursday but
it has been a very hard week at the workshop. I had to charge batteries to write
this new blog. That been said, I have many things to tell you about this week.
As I
mentioned in my previous blog, this week we started with something related with
cubes. Maybe you still wondering that it’s all about but I will tell you all
the necessary to understand everything. This practise consists in fabricating a
cube from a cylinder of aluminium. When I first heard about this practise, was
when my father told me before starting the course. As he did the course a few
years ago, he already did this practise in the past and still preserve his
cube. I must admit I was quite nervous as I never did such a complex and
complicated task but also a little bit excited, notwithstanding here we start.
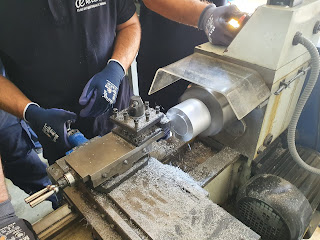
First, we had to cut a slice of aluminium from a big cylinder of aluminium. As the sides of the cubes needs to be of an exact measure of 2 1/16 inch, we needed to cut it a little bit thicker than this side. This is due because if we cut it at the exact same size, then we couldn’t sand the surface, or we could cut more than necessary. If we mess it up at the beginning, there is no way back. The first piece was cut with the help of an electrical band saw and we cut approximately a slice of 2 3/16 inch to have some margin.

Here is
when the suffering started, as I haven’t cut with a lot of margin, and with the
help of the lathe, I only needed to file the surface almost a 1/16 inch. It may
seem too little, but you must believe me, it is a lot to file. First, we had to
use files with bigger teeth for sanding faster the surface. As we where approaching
the 2 1/16 inch we had to change to a file with more teeth, these ones are used
for sanding finer the surface and in that way, we could approach the measure
needed. As we needed to do a flat surface, we needed to check constantly that
we were sanding equally through all the surface. We also used squares to check
that the surface was completely flat. As you can see it almost as perfect as the side flatten with the lathe, quite proud of me being the first time.
Vicente (our monkey instructor) said that this process was the most important but also the hardest and once finished the rest was easy piece lemon squeeze. But as again, everything was new for me and from the beginning I’ve been flying by the seat of my pants. We’ve been studying the tools but as it was the first time using them, I was scared to mess it up in any moment. But I told to myself that if my father did it, I was able to do it also. So I always take a deep breath and continue with the task trying do it as best as possible and experiencing how to use the tools.
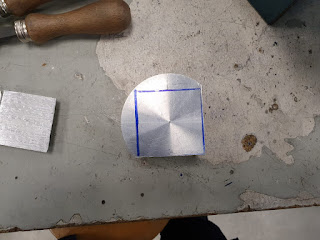
Final but not least, I only had time to cut two more sides and tried to sand them. For cutting the other two sides, first of all we needed to locate the centre of side flatten with the lathe. Then we had to use the square, a rule and a marker pen for drawing the lines of the sides of the cube. Once checked that all of them had a 90º on their vertex, we proceed to cut this side with a manual saw. This process is quite challenging as you need to try cutting the side as much straight as you can. But that’s not all, the amount of energy that you need for cutting the side is amazing. After cutting a side you are sweating like in the movie Airplane and if you touch the cube or the cut side it is extremely hot, if you touch if without gloves you get burnt. This is due to the friction of the saw with the aluminium. Finally, after cutting two sides I started sanding them but time ran out and we finished the week of workshop.
We still have
more classes on next week for finishing the cube and honestly, I was expecting of being more difficult manufacturing the cube. At the beginning I was scared
because I was doing something difficult without the necessary skill as it was
my first time. But thanks to all my colleagues and a little bit of monkey see
and monkey do, right now I’m one of the fastest ones doing the cube. I always
like to learn new things and in my humble opinion I always tend to learn fast.
That’s all for today’s blog, I hope you understood all the process behind the manufacturing of the cube. Once done, we will need to do more things in that cube but that will be for another blog. If you are thinking in working with metals, I recommend to take some breaks while working. One of the worst things of doing the cube is the back pain after sanding 3 hours!
See you on
next week folks!


I think I will publish your blog entries as a book!
ResponderEliminar